Tuesday, 21 August 2012

OpenWRT Mjpg_streamer saving to file


By default when you use the file output plugin with mjpg_streamer you can not set the file name just the folder. So what will happen is that folder will quickly fill with time stamped for name picture files. This could be what you want but this is not what I wanted. I wanted a single file in the web server root so I could include it in the web interface.

There are 2 main steps to achieve this. 

  1. Create a shell script that move the snapshot to the web server root(/www/video0.jpg)  
  2. Change the mjpg-streamer service to output snapshot to file and execute shell script to move snapshot


Step 1. The shell script.
This just moves the snapshot to "/www/video0.jpg". The -f is to force overwrite. I called the script "mjpg_save" and saved it to "/usr/bin/


#!/bin/sh
mv -f "$1" '/www/video0.jpg'

don't forget to chmod +x the script


Step 2. Update the service.
You need to edit "/etc/init.d/mjpg-streameradding "\ --output "output_file.so -c /usr/bin/mjpg_save -d 1500" as per below. 
The "-d 1500" is the delay between saving in ms so 1500 = 1.5 seconds. If you have this set too low mjpg-streamer will not get a chance to finish saving this before starting to save the next picture over it leading to corrupt images.  


root@OpenWrt:/etc/init.d# vi mjpg-streamer

#!/bin/sh /etc/rc.common

# Copyright (C) 2009-2011 OpenWrt.org

START=50

SERVICE_DAEMONIZE=1
SERVICE_WRITE_PID=1

PROG=/usr/bin/mjpg_streamer

error() {
        echo "${initscript}:" "$@" 1>&2
}

section_enabled() {
        config_get_bool enabled "$1" 'enabled' 0
        [ $enabled -gt 0 ]
}

start_instance() {
        local s="$1"

        section_enabled "$s" || return 1

        config_get device "$s" 'device'
        config_get resolution "$s" 'resolution'
        config_get fps "$s" 'fps'
        config_get port "$s" 'port'

        [ -c "$device" ] || {
                error "device '$device' does not exist"
                return 1
        }

        service_start /usr/bin/mjpg_streamer --input "input_uvc.so \
                --device $device --fps $fps --resolution $resolution" \
                --output "output_http.so --port $port" \
                --output "output_file.so -c /usr/bin/mjpg_save -d 1500"
}

stop_instance() {
        local s="$1"

        section_enabled "$s" || return 1

        service_stop /usr/bin/mjpg_streamer
}

start() {
        config_load 'mjpg-streamer'
        config_foreach start_instance 'mjpg-streamer'
}

stop() {
        config_load 'mjpg-streamer'
        config_foreach stop_instance 'mjpg-streamer'
}


If all when well you should be able to access the screenshot from a remote computer using http://routerip/video0.jpg


Monday, 20 August 2012

RFnode 1.3

I received some of the PCBs for the new version of my RFnode so I spent a little time today soldering it all together and testing it out. 

This version of the board has following features.

+RGB led (on PWM pins D5, D6, D10) now can make any color.
+CR2032 lithium coin battery powered or USB powered
+Power selector switch to select between USB power and battery(CR2032)
+USnooBie compatible (http://www.frank-zhao.com/usnoobie/
+Programmable via mini USB port (USBISP) and supports the Arduino IDE (USnooBie bootloader)
+nRF24L01+ 2.4Ghz radio transceiver 
+3.3 Volts @ 12Mhz (onboard voltage regulator)
+Breadboard friendly if you add the header (even mini breadboard)
+Only 46x24mm board size 
+SMD parts (to keep testing my soldering skills)


All assembled with radio and breadboard header, ready to go 


With CR2032 battery 

In mini breadboard, without radio attached

OpenWRT mjpg streamer with more then one camera


The Documentation for mjpg streamer in OpenWRT is very light for information and finding information for the /etc/config/mjpg-streamer file is almost impossible.

So I decided to add some of my notes.
One of the great things I have found with mjpg_streamer is that it can support many cameras I have tested 3 Logitech C270 and will be testing more when I get a bigger USB hub.
To setup mjpg_streamer for the second camera you need to change the device from "video0" to "video1" then for the third camera same again change "video1" to "video2"

Running multiple cameras is not supported by the default service/config so you ether need to edit /etc/init.d/mjpg-streamer to support the extra settings or run mjpg_streamer from the command line


Below is the command line I am using.
mjpg_streamer --input "input_uvc.so --device /dev/video0 --fps 3 --resolution 720x350 --output "output_http.so --port 8080" 


mjpg_streamer --input "input_uvc.so --device /dev/video1 --fps 3 --resolution 720x350 --output "output_http.so --port 8081" 

mjpg_streamer --input "input_uvc.so --device /dev/video2 --fps 3 --resolution 720x350 --output "output_http.so --port 8082" 

I have found that if you put too much load on the processor you get a lot of garbled frames. So if you are using 1280x720 I recommend you don't have a frame rate of 15fps but something low like 1-5fps. You can even mix them up so on one of the robots I am building he has one camera with a low resolution high frame rate and a second camera with a high resolution low frame rate.


Friday, 17 August 2012

Now printing with platic

Just purchased an old Rapman that needed a little work from someone in Sydney for a good price. It was kind an impulse buy, I have ordered and have been waiting for a Makibox for a few months(http://www.makible.com/products/makibox-a6-1) but one of the guys called me and asked if I wanted it.  


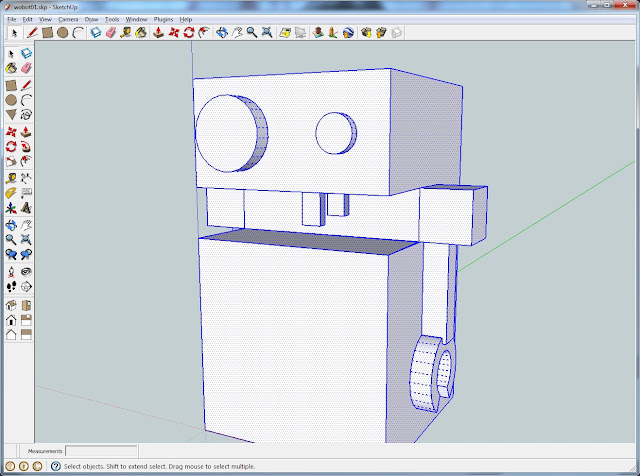
So I introduce my first PLA testprint. I call him Wobot, took about 5 mins to design in Google Sketchup and takes about 40mins to print.


Wobot in Google Sketchup
Wobot printing


Wobot printed and cleaned up a little, accidently broke his teeth out while cleaning


Before printing with PLA I did try printing with ABS but as I don't have a heated bed I get bad warping and the print quality does not look as good.


Very first print, A happy/sad coin


Here are some of the ABS parts I printed before I got the PLA.