Showing posts with label 3D printing. Show all posts

Monday, 29 October 2012

Garden Gnome update


I presented my Gnome project the other night at a meetup and he gathered enough interest to win me a $500 gift voucher :). Seems people like the idea of a house/yard full of little wireless nodes crammed with sensors and RGB leds with the ability to respond to events. 

I I do like the idea of having pot plants change color if I get an email (different plant per email account) or a yard that glows red if someone is detected in there at night.

Thursday, 11 October 2012

A smarter garden Gnome

A smarter garden Gnome.


Still a work in progress but meet one of my garden gnomes. 

I still need to print him a better case to mount the soil moisture pins better and make him more presentable in general.  


At his heart he is powered by one of my RFnodes so he is wireless and has an array of sensors that he reports on back to the network. He currently reports back the light levels, soil moisture, temperature, humidity and having a RGB led that make him glow any color I can have him signal the plants status or as being network I can use the RGB led to make him (and his friends) signal anything the network want him to.

I have some small PIR motion sensors I also want to mount as his nose and print a case that can house the bigger batteries required by the RGB led.


Tuesday, 25 September 2012

Getting ready for more Rapman upgrades


I have received more parts so soon it will be time to try some more 3D printer mods.

Besides more screws, bolts, washers, bearings and plastic I received a few more parts to use.


  • 30mm 12volt fans. One problem I have with my Rapman is that the extruder overheats and jams when printing sometimes. To overcome this issue I upgraded the part cooling fan and ducted it to cool the extruder more then the part and added a 80mm fan to the side of the printer to help cool everything. This mostly works but effect the head heat up time but helps with  part cooling(on one side). With the smaller fans installed to only the parts that need them I should be able to control the thermals better and be able to get better print quality.
  • LEDs. I am going to add some better lighting around the printhead to help the camera (as I normally leave the room lights off).
  • PTFE TEFLON Tubing. Having a 470gram stepper motor and all the extra supports for it on a printhead seems a little silly to me. I thought that a goal would be to reduce the printheads mass so you don't have to counter/fight as much inertia. So if I mount the fillament feed away from the printhead I and feed the fillament to the printhead via the PTFE tube I should be able to have a printhead that is less then 30% it's current mass. This will allow me to improve the movement speeds of the printhead while reducing the power required to move it and reduce the strain/wobble from the printhead's inertia.
  • New hotend. The hotend on the Rapman comes sealed in fire cement, on my printhead it is crumbling and leaving what looks like sand everywhere.  It is about time for me to replace. I have resurrected the old printhead a few time already but as the resurrections are becoming more involved and makeshift I am expecting it to soon hit a point where I just need to let it die in peace. After it dies I might use it to recycle my waste PLA back into fillament.       
It is now getting to a point where I can almost make a whole new printer, so that might be were this project ends up. I think it should be easy to make a lowcost PLA 3D printer that is a fraction of the price of the current 3D printers available. By limiting it to PLA and dropping the printhead mass you should be able to lower the stepper motor size and power requirement which would allow you to use smaller motors and motor drivers so you could use lower cost of everything leaving you with a smaller cheaper 3D printer.  

Saturday, 22 September 2012

Tinkercad Gnome


I recently discovered https://tinkercad.com.

A very user friendly online CAD application that allows you to quickly design 3D objects and download them as STL files ready for 3D printing. 


Here is a Gnome I created in just a few minutes.
https://tinkercad.com/things/9NMMuTF6O3s-gnome


and here is him after I printed.

The Tinkercad UI is very straight forward and basic and only takes a few minutes to learn and master.


Now for the next step of adding RFnodes to them to create my Gnome army


3D Printer setup

I have upgraded my 3D printer setup.

Now instead of him sitting on a cardboard box he has his own rack and I can have the spools of plastic hanging above him (need to get more plastics to fill the space) 


I have also added one of the routers with openWRT, some LEDs for lighting and a Logitech c270 HD webcam so I can remotely keep an eye on him.  

I am in the process of upgrading his printhead to support better cooling for the extruder and printed part also will have a few built in lights and maybe a small camera.

Once I get my Makibox printer I might have to expand the setup even more.


Friday, 17 August 2012

Now printing with platic

Just purchased an old Rapman that needed a little work from someone in Sydney for a good price. It was kind an impulse buy, I have ordered and have been waiting for a Makibox for a few months(http://www.makible.com/products/makibox-a6-1) but one of the guys called me and asked if I wanted it.  


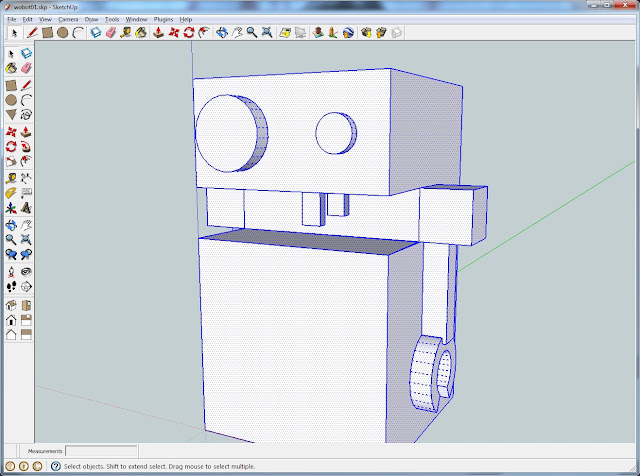
So I introduce my first PLA testprint. I call him Wobot, took about 5 mins to design in Google Sketchup and takes about 40mins to print.


Wobot in Google Sketchup
Wobot printing


Wobot printed and cleaned up a little, accidently broke his teeth out while cleaning


Before printing with PLA I did try printing with ABS but as I don't have a heated bed I get bad warping and the print quality does not look as good.


Very first print, A happy/sad coin


Here are some of the ABS parts I printed before I got the PLA.